Ram nab!
This article will introduce a selection of methods of capturing RAM for analysis, we are going to dive into the Windows O/S here and later, will address Linux and Mac OS.
In the previous post Ram Capture we looked at the rationale about securing this often vital piece of digital evidence, so how do we go about doing that?
Scene assessment
Investigators will need to make a number of risk assessments prior to compilating a RAM capture. Considerations like – do you have the right tools, skills and training to carry out the capture for the form factor and operating system in front of you? What part of the investigation will the RAM be addressing ? Who is going to review the capture and what tools and methods are going to be employed there ?
So lets just jump past those steps and get to the actual meat of the work.
Stick it in Jim
The following list are some of the applications I will be looking at over a series of posts, the first of which is AccessData FTK ® Imager
- AccessData FTK Imager
- ADF Triage
- Belkasoft Live RAM Capturer
- Dumpit
- EnCase RAM Capture
- Magnet Forensics Ram Capture
Digit4lBytes is not responsible for the content of external sites.
AccessData FTK ® Imager
A workhorse of many a digital forensic unit (DFU) the ability for FTK imager to be run from a USB device and its cost point (Free) has not harmed its place in the DIFR pantheon of go to software.
FTK Imager is a preview and imaging tool. You can open a physically attached drive, the contents of a folder or a forensic image. You can also view images over a network.
FTK Imager allows you to preview evidence to determine if further analysis using FTK in needed. Furthermore, you can use it to triage a device and export files and drive information prior to a full forensic analysis.
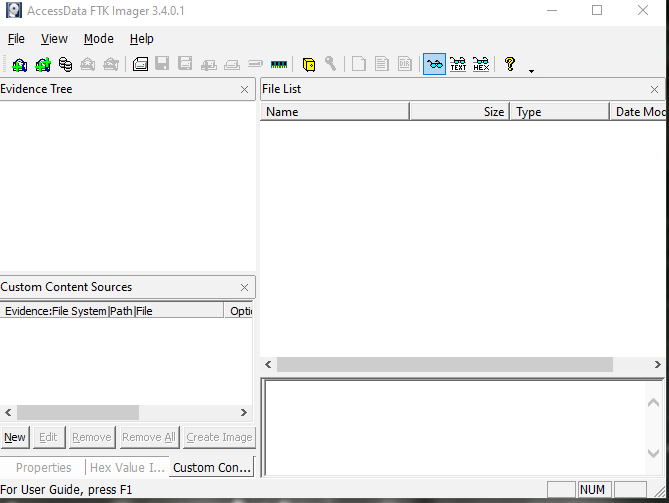
Once you have downloaded and installed FTK (Or run from a removable storage device) You are presented by a common forensic format of the three-pane view.
The evidence tree, File list, properties, hex value interpreter, custom content sources and viewer. All of which (except viewer) can be undocked and moved around a screen.
In this case we are looking at a windows system, so we are going to collect the RAM from a running device.
When using FTK Imager to create a forensic image you need to utilise a write blocking device. This ensures that the OS does not alter the drive when you attach it to a Forensic evidence recovery device (FRED)
Also of note is that we need to have some storage space as well, as we will not be saving the memory dump to the suspect system! It is important that we take this into account before we start the process to determine the size of the collection drive required.
When capturing active memory FTK Imager creates a text file of the contents of the RAM.
The following formats are supported:
- RAW/DD Images
- EO1 (EnCase Expert witness format – EWF)
- AFF ( Advanced Authoring Format)
- AD1 (Access Data file format)
- L01 ( EnCase Logical evidence file – LEF)
All of which can be later mounted for review.
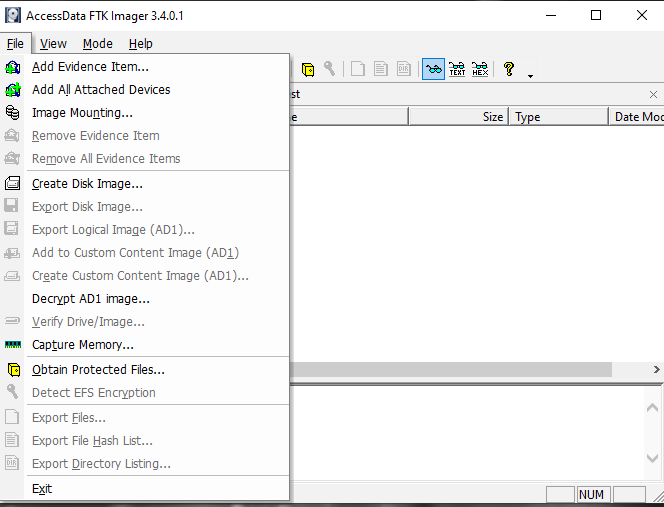
From the Main screen we are going to select the <File> menu and navigate to the ‘Capture Memory’ option.
The Memory Capture screen has a few options to consider as part of the process. We need to select the file path for the RAM to an attached storage area rather than on the target device,otherwise we will overright data and change the system. The filename needs to be something that relates to the capture its self, in my case I have called it WIN_PF_1.mem – indicating that its a windows capture for exhibit PF/1 ( Other considerations here could be the size of the Ram and the system WIN_86x_8GB_PF_1.mem for example)
These details are needed for when the anayalis phase of the capture is conducted, its often easier to have them in the filename as well as in your notes.
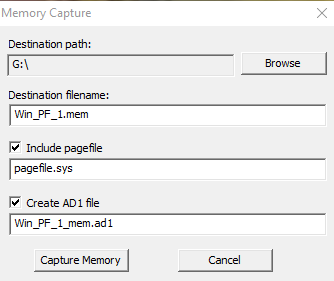
In this example I have also chosen to capture the Pagefile.sys and create an AD1 forensic image (This will have an impact on the destination drives capacity requirements) .
Once the capture is complete verification hash values can be found within the text file created during capture.
Part Two in a series – Ram Capture Adventures